How To Homebrew
In response to some questions I’ve received, I am going to outline the different supplies needed to brew beer at home. First some general info:
The standard homebrew batch is 5 gallons. When I say standard, I mean that nearly all homebrewing equipment manufactures, books, recipes etc all assume that you are going to be making a 5 gallon batch. I’m not sure how 5 gallons was decided but that’s now typical. That being said, there are two different methods to brew beer at home. Most beginners begin by using an extract based method. The more advanced way, and the way that professional brewers use, is an all-grain method. Or as I like to call it, the “real-ass” way. I’ll describe the differences in these processes later but the main difference when it comes to gear is that with all-grain, you need to be able to boil the full volume of beer you are making. With extract you only need to boil a few gallons. I am going to be brewing only 2-3 gallons at a time, the “real-ass” way. As I describe necessary equipment, it will become clear why I am choosing to brew less than what is typically “standard.” I will outline the gear needed at each step of the way.
The Mash:
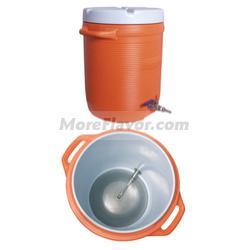
Grains are steeped for around an hour in hot water. About 1-2 quarts of water are used for every pound of grain. For a 5 gallons batch, about 10 pounds of grain is needed. I will be using 5-7 pounds for my batches. When brewing standard batches, it is typical to use a 5 gallon cooler for this step. Coolers are meant to insulate heat so these work perfectly for holding 10 pounds of grain along with 4-5 gallons of water over the course of an hour without losing too much heat. These coolers also have a slotted bottom that allows you to easily drain the wort from the mash.
Since I am using smaller batches, I am going to be doing this on the stove in a 5 gallon pot. I purchased nylon grain bags that are meant to hold the grain while they are steeping and allow me to easily remove them from the water. This should allow me to also regulate the temperature by just adding heat from the stove. The tricky bit though when doing this is to be carefull not to burn the grain.
Once the grain has finished steeping, more water is rinsed through the grains until the drained volume equals about a gallon more than the desired brew size, ie 6 gallons or in my case, 3ish gallons. This entire volume needs to be boiled. Extract manufactures will boil this until 80% of the water is evaporated. The result is a thick, syrupy, sticky mess called malt extract.
The Boil:
For all-grain brewers, the entire volume of wort needs to be boiled. If you are making a 5 gallon batch, you will need to be boil 6 gallons of wort (about a gallon gets boiled off after an hour). The pot needs to be big enough to hold this volume without boiling over, so about a 10 gallon pot is needed. It is also important that the wort be brought to a boil as quickly as possible, and as big of a boil as possble. This “hot-break” helps to create a clearer beer. If you are brewing 5 gallons of beer, a kitchen stove top is not powerful enough to bring 6 gallons, in a 10 gallon stainless steel pot, to a boil, let alone quickly. This is the main reason why most homebrewers brew using extract. Those who do brew all grain, buy an outdoor propane burner in order to complete this.
Since I am brewing smaller batches, I will be able to complete this on the stovetop in my 5 gallon pot.
Extract brewers only need to boil 3 gallons of water. The malt extract is added and once the boil is complete, 3 gallons of cold water is added to quickly cool the wort.
Cooling the wort:
The wort needs to be cooled as quickly as possible. About 30 minutes is ideal. The wort needs to be cooled to a temperature that will not kill the yeast. It needs to be done quickly so it can start fermenting and prevent any bacterial infection.
As I mentioned above, extract brewers have this step pretty easy. They can just add cold water and then put the pot in an ice bath for a little bit.
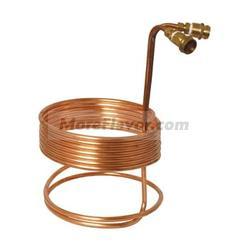
All-grain brewers doing standard batches have a difficult time here. Bringing 5 gallons of boiling wort down to 65 degrees is not an easy task. Tools such as an immersion chiller are used. These copper spirals are inserted into the brewpot. On one end of the tube, cold water is pumped in and exited through the other end. There are various other pieces of equipment that can be used here but these are the most common in homebrewing.
I will be attempting to cool my wort using only an ice bath. I can’t add cold water since I won’t be using extract. Adding water will thin out the wort and weaken it. If the ice bath method doesn’t work, then I’ll likely get an immersion chiller.
Fermentation:
Regardless of what method you are using to brew, this step is all the same. Typically a glass or plastic carboy is used to the hold the wort, along with the yeast, and left to create beer.
As you can see, there isn’t too much gear that needs to be purchased, especially if you are using extract or brewing smaller all-grain batches. There are several other pieces of equipment that are needed as well if you want to make the best beer possible. A 5 gallon pot may not cost much but everything else adds up.
Thermometers:
Temperature is everything. Mashing too high will release foul tasting enzymes so you need to make sure the mash temperature is just right. You also have to make sure it isn’t too cool either otherwise the starch won’t convert into sugar. Temperatures also need to monitored when fermenting to prevent killing the yeast.
Hydrometer:
A hydrometer is used to measure the density of liquid. For the purposes of beer, it is used to calculate the alcohol content. Pure water is 1.000. Depending on how strong you are making the beer, the density, or gravity, will be, let say, 1.050 before fermentation. The added density is from the sugar that was extracted from the grains. After fermentation, the yeast will have consumed the sugar dropping the density to about 1.012. By multiplying the difference in the original and final gravity by 131.25 (don’t ask me what this number means, some scientist figured it out) you will find out that you have a beer that is 4.99% alcohol.
Volume and weight measurement:
If you don’t already own these, you will need to be able to measure quarts and gallons of water as well as pounds of grains and ounces or grams of hops.
Bottling equipment:
Tubes, syphons, bottles, bottle caps, bottle capper etc
Sanitation:
Everything must be sanitized! This is one of the most important part of brewing. You will need sanitizer and a bucket to hold enough of it to sanitize your fermenters, bottling stuff, thermometers/hydrometers etc.
The good news is that ingredients are pretty inexpensive. Barley is about $1.50/lb. I am using about 5-7 pounds per batch. Hops are about $1.50/ounce. I am using 1-2 ounces a batch. Yeast is about $6 a batch.
There you have it! Any questions, feel free to ask!
All the pictures above came from MoreBeer!’s website. Once I brew my first batch, I’ll post some photos from that.


